You can transform your small yard by installing retaining walls that create level terraces from sloped terrain, instantly doubling your usable space. Choose materials like concrete blocks for affordability or natural stone for elegance, keeping walls between two and four feet high for compact areas. These walls allow you to build terraced garden beds, multi-level seating areas, and even incorporate hidden storage compartments. Proper drainage, achieved with gravel backfill and weep holes, prevents structural issues while maximizing your outdoor potential.
Key Takeaways
- Create terraced garden beds with stepped levels to reveal more planting opportunities and distinct microclimates that support a diverse range of plants.
- Build multi-level seating areas with built-in benches and stepped walls to maximize entertainment space and functionality.
- Incorporate hidden storage compartments within retaining wall design to prevent yard clutter and organize outdoor equipment efficiently.
- Utilize vertical space with tiered walls to create level surfaces for various activities while optimizing layout accessibility.
- Design L-shaped or curved walls to create intimate conversation areas and define separate zones for different purposes.
Understanding the Basics of Retaining Wall Design for Small Spaces
Retaining walls serve as both functional barriers and design elements that can dramatically transform your small yard’s usable space.
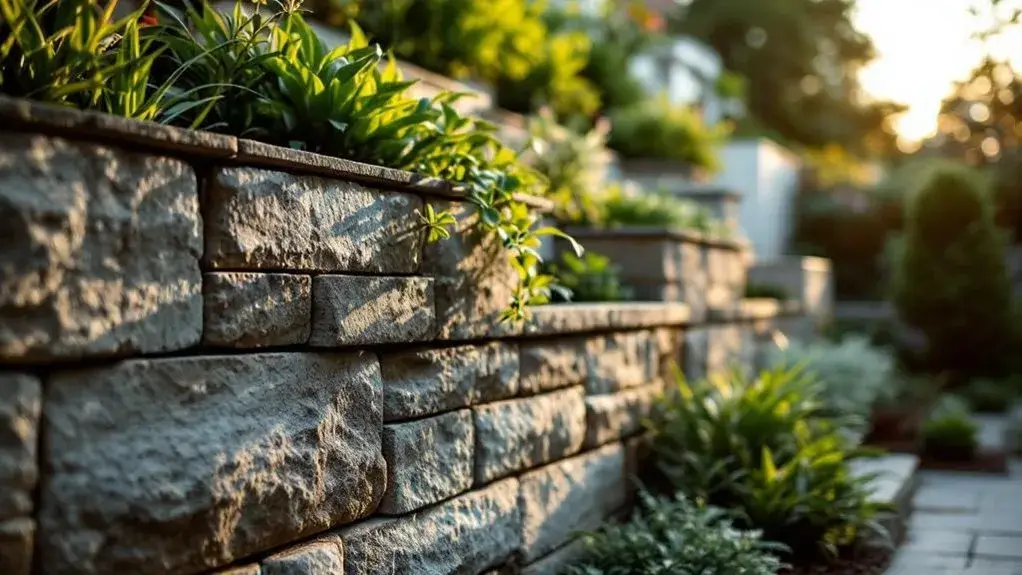
You’ll create level terraces from sloped terrain, effectively doubling your planting and entertainment areas. Choose materials that complement your home’s architecture—concrete blocks offer durability while natural stone provides organic appeal.
Height matters in compact spaces; walls between two and four feet maximize impact without overwhelming proportions.
Consider drainage requirements early, as proper water management prevents structural failure.
Strategic placement creates defined zones for different activities.
You’re fundamentally building vertical real estate that opens possibilities previously limited by your yard’s natural topography.
Choosing the Right Materials to Match Your Yard's Style and Budget
When selecting materials for your retaining wall, you’ll need to balance aesthetic appeal with practical considerations like cost and maintenance requirements.
Concrete blocks offer affordability and durability, perfect for modern yards. Natural stone creates timeless elegance but costs more upfront.
Timber provides warmth and works well with cottage-style gardens, though it requires regular maintenance. Steel and aluminum deliver sleek, contemporary looks with minimal upkeep.
Consider your yard’s existing features—match brick walls or complement wooden fencing.
Budget-conscious homeowners can mix materials, using expensive stone as accents with affordable concrete blocks as the primary structure.
Creating Terraced Garden Beds for Maximum Planting Space
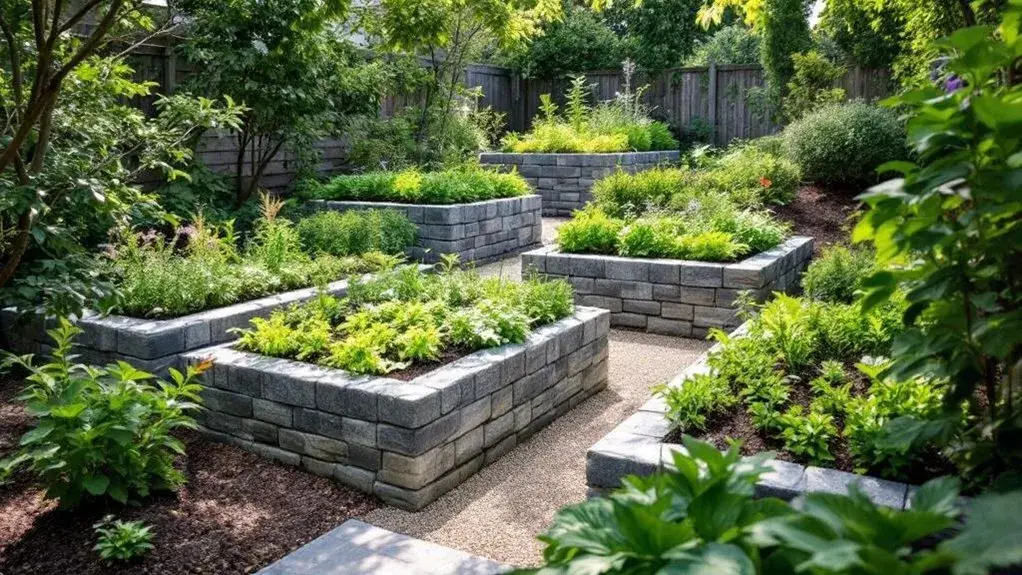
By transforming sloped areas into stepped levels, you’ll reveal dramatically more planting opportunities in your small yard. Each terrace creates distinct microclimates, letting you grow diverse plants that wouldn’t thrive together on flat ground.
Upper levels drain faster, perfect for herbs and succulents, while lower terraces retain moisture for vegetables and flowers.
- Plan drainage carefully – Install gravel behind walls and use perforated pipes to prevent water buildup
- Vary terrace heights – Create 12-18 inch levels for shallow-rooted plants, 24+ inches for deeper systems
- Consider sun exposure – Place sun-loving plants on higher terraces, shade-tolerant varieties below
- Add pathways – Include stepping stones between levels for easy maintenance access
Building Multi-Level Seating Areas and Entertainment Zones
Since traditional patios consume precious square footage in small yards, retaining walls offer a clever solution by creating elevated platforms that stack your entertaining space vertically.
You’ll transform steep slopes into functional zones by building stepped seating walls at varying heights. Install built-in benches along retaining wall tops, adding comfortable cushions for guests.
Create intimate conversation areas by positioning walls in L-shapes or curves around fire pits. You can incorporate storage compartments within wall structures for outdoor cushions and entertaining supplies.
Design multiple levels with different purposes—upper terraces for dining, lower areas for lounging, maximizing every inch of available space efficiently.
Incorporating Storage Solutions Into Your Retaining Wall Design
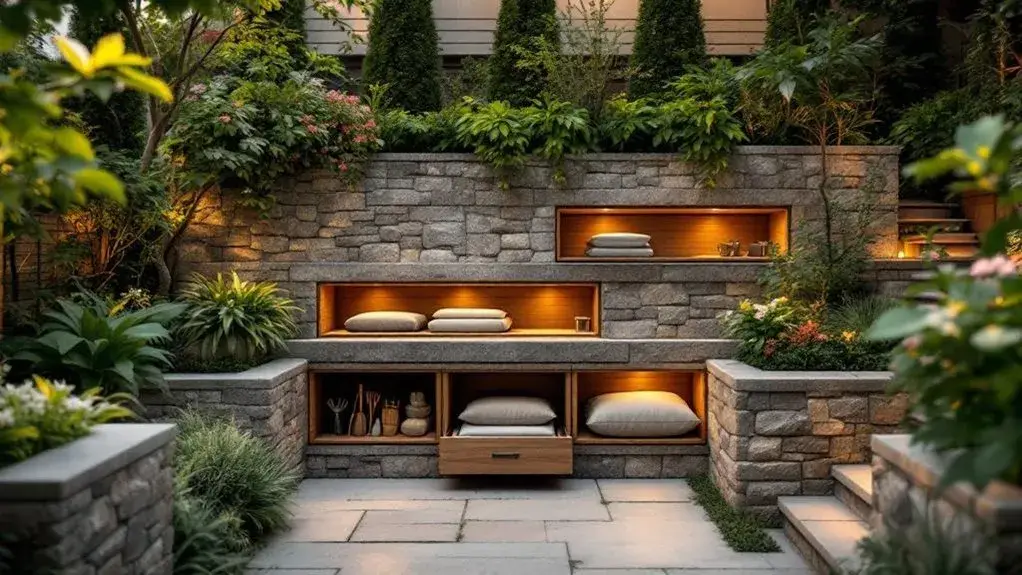
While retaining walls serve as structural elements, they can simultaneously function as hidden storage powerhouses that eliminate clutter from your small yard.
You’ll transform dead space into functional areas by incorporating built-in storage compartments during construction. These clever solutions keep tools, cushions, and seasonal items organized while maintaining your wall’s aesthetic appeal.
Smart storage integration requires planning during the design phase, not as an afterthought.
- Install weatherproof storage cubbies behind removable stone or wood panels
- Create pull-out drawers within the wall’s base structure
- Design hinged bench tops that reveal storage compartments underneath
- Build recessed shelving niches for decorative items and supplies
Managing Drainage and Preventing Water Issues in Tight Spaces
Although small yards present unique drainage challenges, proper water management becomes critical when retaining walls redirect natural water flow patterns.
You’ll need to install French drains behind your wall to prevent water buildup and structural damage. Include weep holes every six to eight feet along the base, allowing trapped water to escape naturally.
Add a gravel backfill layer for improved drainage and consider permeable pavers for walkways to reduce surface runoff.
Position downspouts away from your retaining wall’s base and grade soil properly to direct water toward designated drainage areas rather than pooling against your structure.
Adding Lighting and Decorative Elements to Enhance Visual Appeal
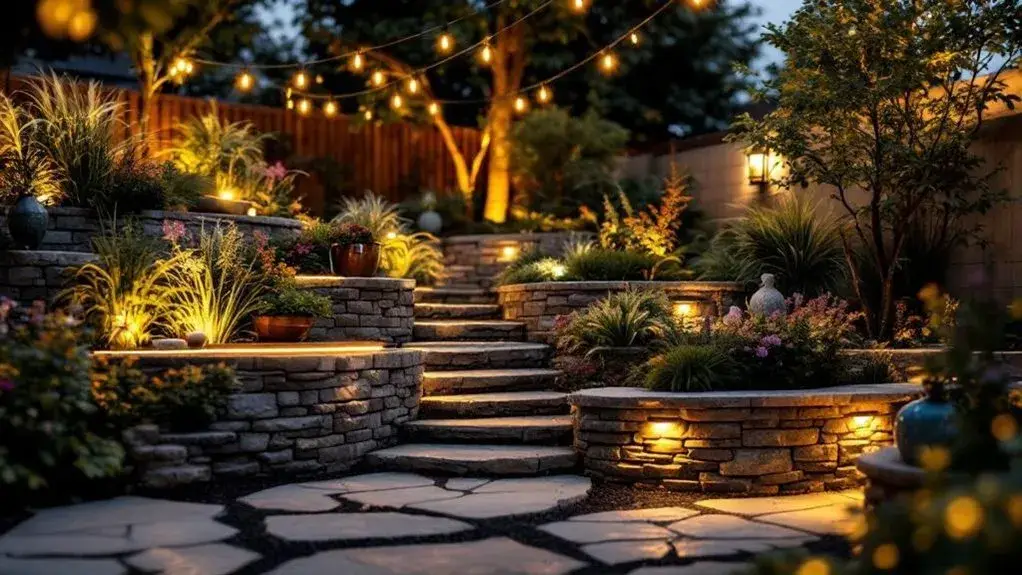
You can transform your retaining wall from a purely functional structure into a stunning focal point by incorporating strategic lighting and decorative elements.
Consider installing LED strip lights along the top cap or embedding spotlights at the base to highlight the wall’s texture while creating ambient evening illumination.
Integrate decorative accents like built-in planters, textured panels, or natural stone capping to add visual interest and complement your yard’s overall design aesthetic.
Strategic Lighting Placement Options
Since proper lighting transforms retaining walls from mere structural elements into stunning focal points, you’ll want to contemplate several key placement strategies that maximize both functionality and visual impact.
Cap lighting creates dramatic silhouettes by positioning fixtures directly on wall tops, while step lighting guarantees safety by illuminating each tier. Uplighting from ground level emphasizes wall texture and creates depth, and backlighting behind plantings adds mysterious shadows.
- Cap lighting – Mount LED strips or small fixtures along wall tops for elegant outline definition
- Step lighting – Install recessed lights in each tier for safe navigation and visual continuity
- Uplighting – Place ground-level spotlights to highlight stone texture and architectural details
- Backlighting – Position lights behind plants to create dramatic silhouettes against wall surfaces
Decorative Accent Integration Methods
Five key integration methods can transform your retaining walls into stunning landscape features that combine structural purpose with artistic flair.
You’ll achieve maximum impact by embedding LED strip lights directly into wall joints, creating seamless illumination that highlights texture and form.
Install decorative planters at varied heights to add vertical interest and soften hard edges.
Incorporate natural stone or mosaic tile accents to introduce color and pattern variation.
Mount artistic wall sculptures or metal panels for contemporary appeal.
Finally, integrate water features like small fountains or spillways that cascade down wall surfaces, creating movement and soothing sounds.
Planning and Installation Tips for DIY-Friendly Retaining Wall Projects
While professional installation might seem tempting, building your own retaining wall can be both cost-effective and rewarding when you follow proper planning procedures.
Start by checking local building codes and obtaining necessary permits. Mark utility lines before digging, and guarantee proper drainage to prevent water damage.
- Excavate to the correct depth – typically one-tenth of the wall’s height plus 6 inches
- Level your base thoroughly using crushed gravel and a plate compactor
- Install drainage pipes behind the wall and backfill with gravel
- Step back each course slightly to create natural stability and prevent bulging
Frequently Asked Questions
Do I Need Permits or HOA Approval for Retaining Walls?
You’ll typically need permits for retaining walls over 3-4 feet tall, though requirements vary by location.
Check with your local building department first. If you live in an HOA community, you’ll likely need their approval regardless of height, as retaining walls can affect neighborhood aesthetics and property lines.
Don’t skip this step – you could face fines or removal orders.
Contact both your municipality and HOA before starting construction to avoid costly complications.
How Close Can Retaining Walls Be Built to Property Lines?
You’ll typically need to maintain a setback of 2-6 feet from your property line when building retaining walls, but this varies considerably by location.
Check your local zoning codes first, as some areas allow walls right up to the boundary while others require substantial distances.
Your HOA might impose stricter rules than municipal codes.
Height also affects setback requirements – taller walls often need greater distances from property lines.
What's the Maximum Height for DIY Retaining Walls Without Engineering?
You can typically build DIY retaining walls up to 3-4 feet tall without requiring professional engineering, though this varies by local building codes.
If you’re planning anything taller, you’ll need engineered plans and permits.
Don’t risk it – walls over 4 feet face considerably more soil pressure and require proper drainage, reinforcement, and foundation design.
Always check your local regulations first, as some areas restrict DIY walls to just 2 feet in height.
How Much Does Professional Retaining Wall Installation Typically Cost?
You’ll typically pay $15-50 per square foot for professional retaining wall installation, depending on materials and complexity.
Basic concrete block walls cost less, while natural stone or engineered systems run higher.
Expect to spend $3,000-8,000 for most residential projects.
Factors affecting price include wall height, soil conditions, drainage requirements, and site accessibility.
You’re paying for expertise, proper engineering, permits, and warranties that guarantee your wall won’t fail over time.
Can Retaining Walls Increase My Property Value Significantly?
Retaining walls can boost your property value, though the increase varies by location and quality.
You’ll typically see a return of 50-80% of your investment, with well-designed walls adding $5,000-$15,000 to your home’s worth.
They’re especially valuable if you’ve created usable space from a sloped yard or enhanced your landscape’s functionality.
The key’s choosing materials and designs that complement your home’s style while solving practical drainage or erosion issues.